

Feel like your car is a little sluggish on the I-820 commute or using more gas than it used to? A dirty engine air filter is one of the most common—and easiest to fix—culprits. Swapping it out is one of the quickest and most satisfying bits of maintenance you can do for your vehicle.
How a Clean Air Filter Keeps Your Car Healthy
Think of your engine's air filter as its lungs. To run efficiently, your engine needs the perfect mix of fuel and air. The filter's whole job is to keep road grit, dust, pollen, and other gunk from getting sucked into the most sensitive parts of your engine, all while letting clean air flow through.
Over thousands of miles, that filter gets clogged. It’s a slow process, but eventually, it's like your engine is trying to breathe through a straw. It has to work much harder just to get the air it needs to run, and that inefficiency shows up in ways you'll definitely notice.
The Real-World Impact on Performance and Longevity
When a filter is clogged, your engine compensates by burning more fuel to get the same power, which means worse gas mileage. In fact, ignoring a dirty air filter can hurt your fuel efficiency by as much as 10%. That’s a big deal at the pump.
You’ll also feel that extra strain as sluggish acceleration and a less responsive gas pedal.
When your engine can't breathe, every single component has to work harder. Popping in a clean air filter isn't just a minor task; it's a direct investment in your car's long-term health, preventing premature wear on crucial engine parts.
Keeping up with this simple piece of vehicle maintenance ensures your engine gets a steady supply of clean air for a more complete combustion process. That translates directly to:
- Better Fuel Economy: A happy engine doesn't have to waste fuel, saving you money.
- Improved Acceleration: You'll notice the difference when your car gets the air it needs, right when it needs it.
- Reduced Emissions: Burning fuel more efficiently means fewer harmful pollutants coming out of your exhaust.
- Longer Engine Life: You're protecting pistons and cylinder walls from abrasive dirt particles that can cause serious damage over time.
What You'll Need: Tools and the Right Filter
Alright, let's get our hands dirty. The good news is you won't need to roll out a giant professional toolbox for this job. Most of the time, changing an air filter only requires one or two basic tools you probably have lying around in the garage.
First thing's first: pop the hood and find the air filter housing. It's usually a big, black plastic box. Take a look at how it's held together—you'll likely see simple metal clips you can flip open by hand or a few screws holding the lid down.
Depending on your car, you’ll probably just need one of these:
- A Phillips-head screwdriver
- A flat-head screwdriver (sometimes useful for prying open a stubborn clip)
- A small socket wrench set if it's held on with bolts
Getting the Right Replacement Filter
This part is crucial. Grabbing the wrong size filter is a rookie mistake that can let dirt and debris sneak past the seal and get straight into your engine. That's a big problem.
The easiest way to get the right part is to check your owner's manual. It will tell you the exact filter you need, no guesswork involved.
Don't have the manual? No worries. A quick online search for your car’s year, make, and model will pull up the right part number. Any auto parts store can also look it up for you in seconds.
Pro Tip: Before you install the new filter, hold it up right next to the old one. This simple side-by-side comparison is the fastest way to confirm you’ve got an exact match.
You'll also see a few different types, like paper, cotton, or foam. For most of us, a standard paper filter is the way to go—it provides great filtration at a low cost. While high-performance cotton filters are reusable, they need to be cleaned and re-oiled, which is more work than most daily drivers need. Sticking with what the manufacturer recommends is always a safe bet.
Your Step-by-Step Guide to Replacing an Engine Air Filter
Alright, let's get our hands dirty. The good news is you don't need a professional mechanic's toolkit or years of experience to swap out an engine air filter. This is one of the easiest DIY jobs you can do, and it usually takes less than 15 minutes.
First things first, pop the hood. You're looking for a large, black plastic box sitting on top of or to the side of the engine. It's called the air filter housing (or airbox), and it’s designed to be easy to get into. The lid is usually held on by a few simple metal clips or a handful of screws.
Before you unclip anything, it's always a good idea to gather what you need. Fumbling around for the right screwdriver mid-job is just frustrating. This quick visual breaks down the essentials.
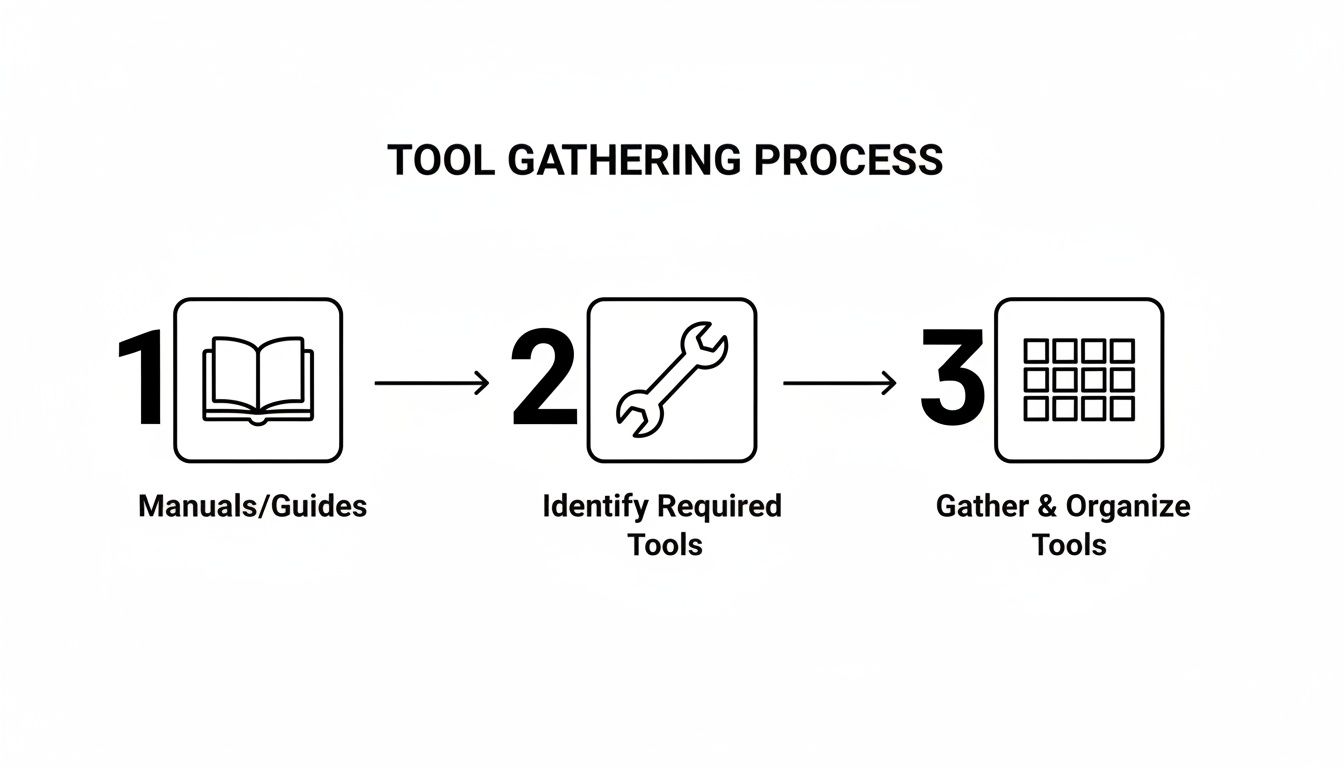
Having your owner's manual, the right tool, and your new filter ready to go makes the whole process smooth and fast.
Getting the Old Filter Out
If your airbox uses metal clips, you can usually just pop them open with your fingers or gently pry them with a flathead screwdriver. If it has screws, grab a Phillips screwdriver or the correct socket and loosen them up. A lot of times, the screws are designed to stay in the lid, so you don't have to worry about dropping one into the engine bay.
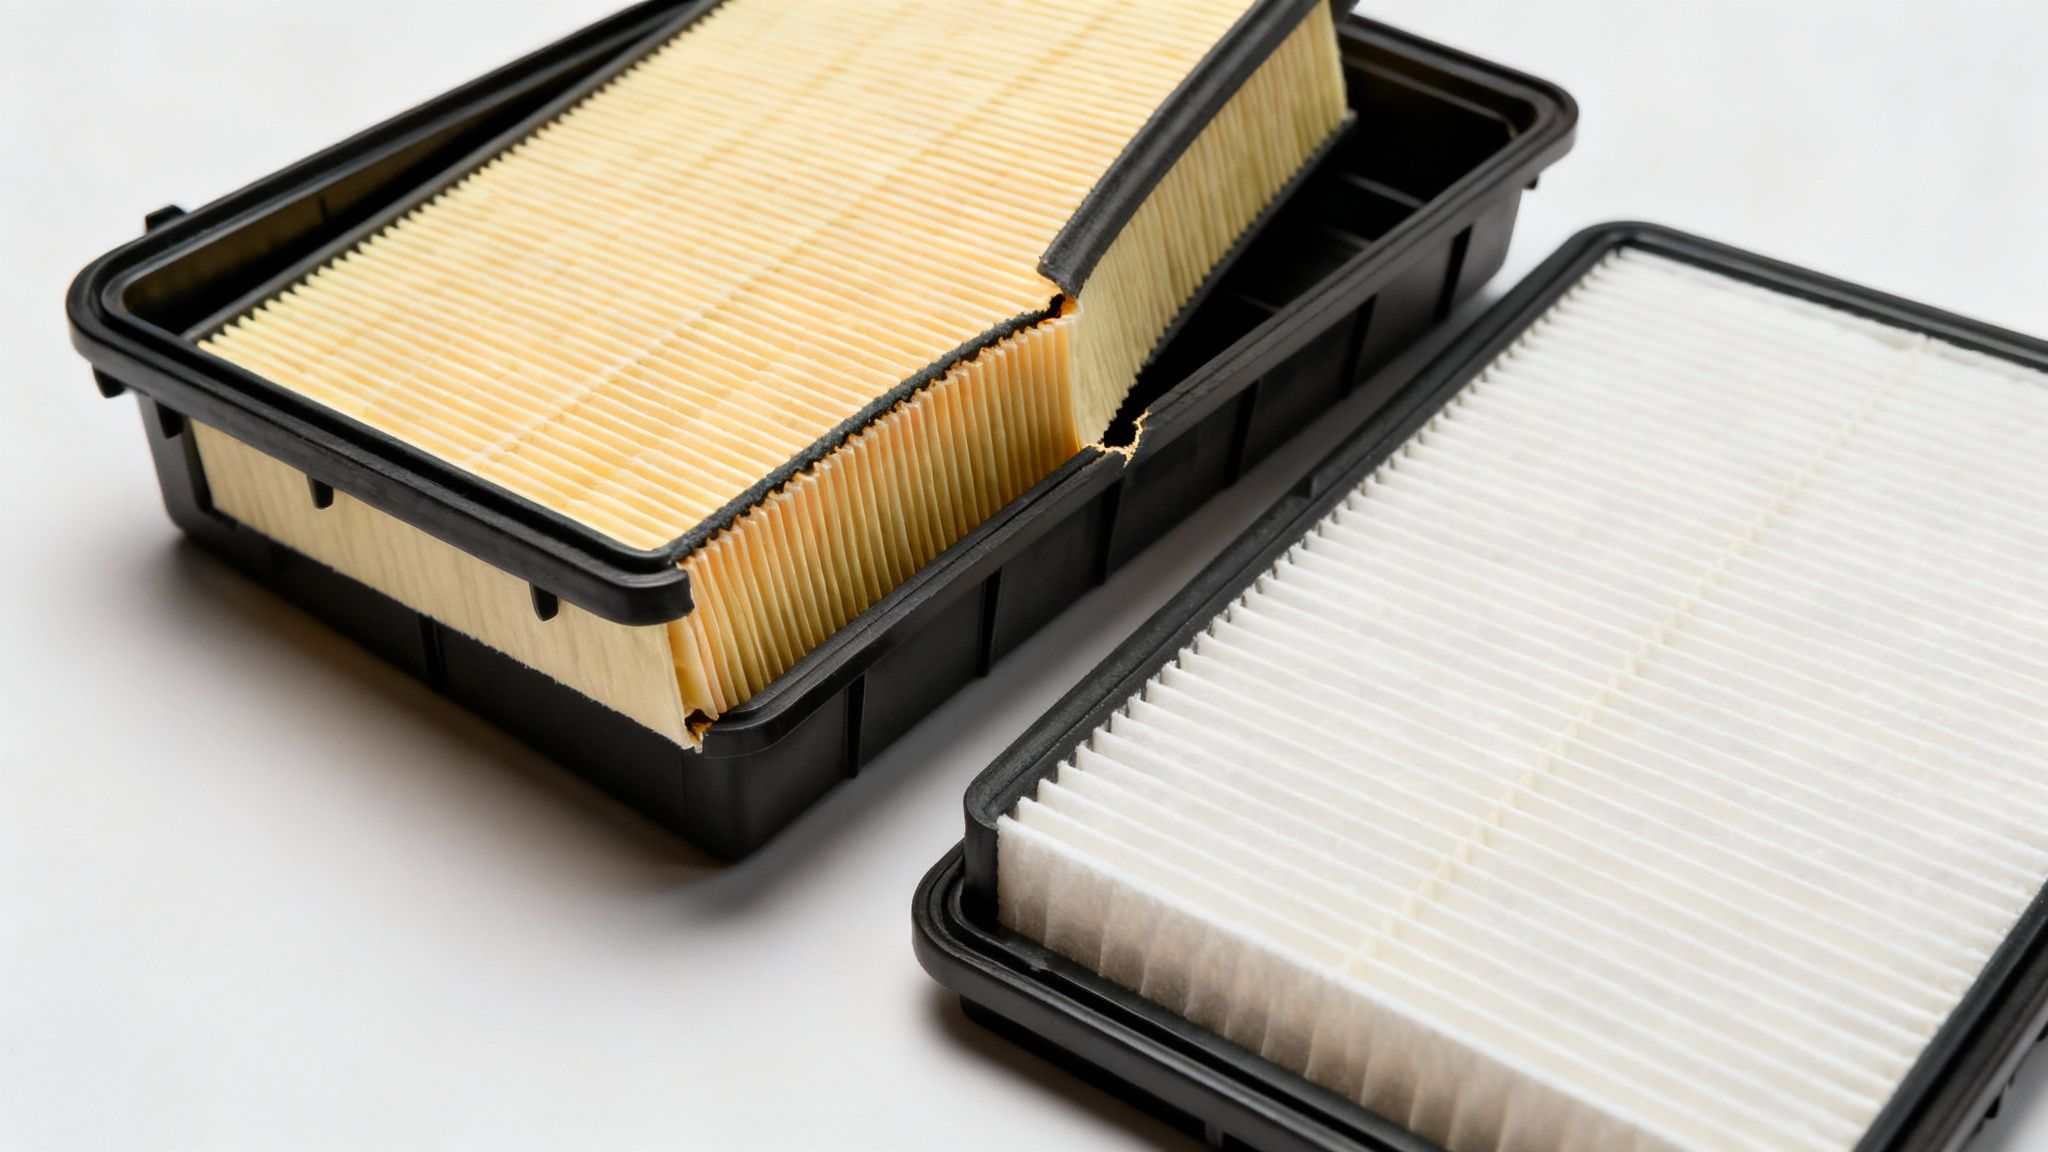
Once the lid is loose, lift it up. You'll see the old filter sitting right there—a big paper or cotton rectangle. Pay attention to how it's oriented before you pull it out. Now, just lift the old, dirty filter straight out of the housing.
If you’re having trouble finding the housing, our guide on where to find the air filter in a car has some great pictures for different vehicle types.
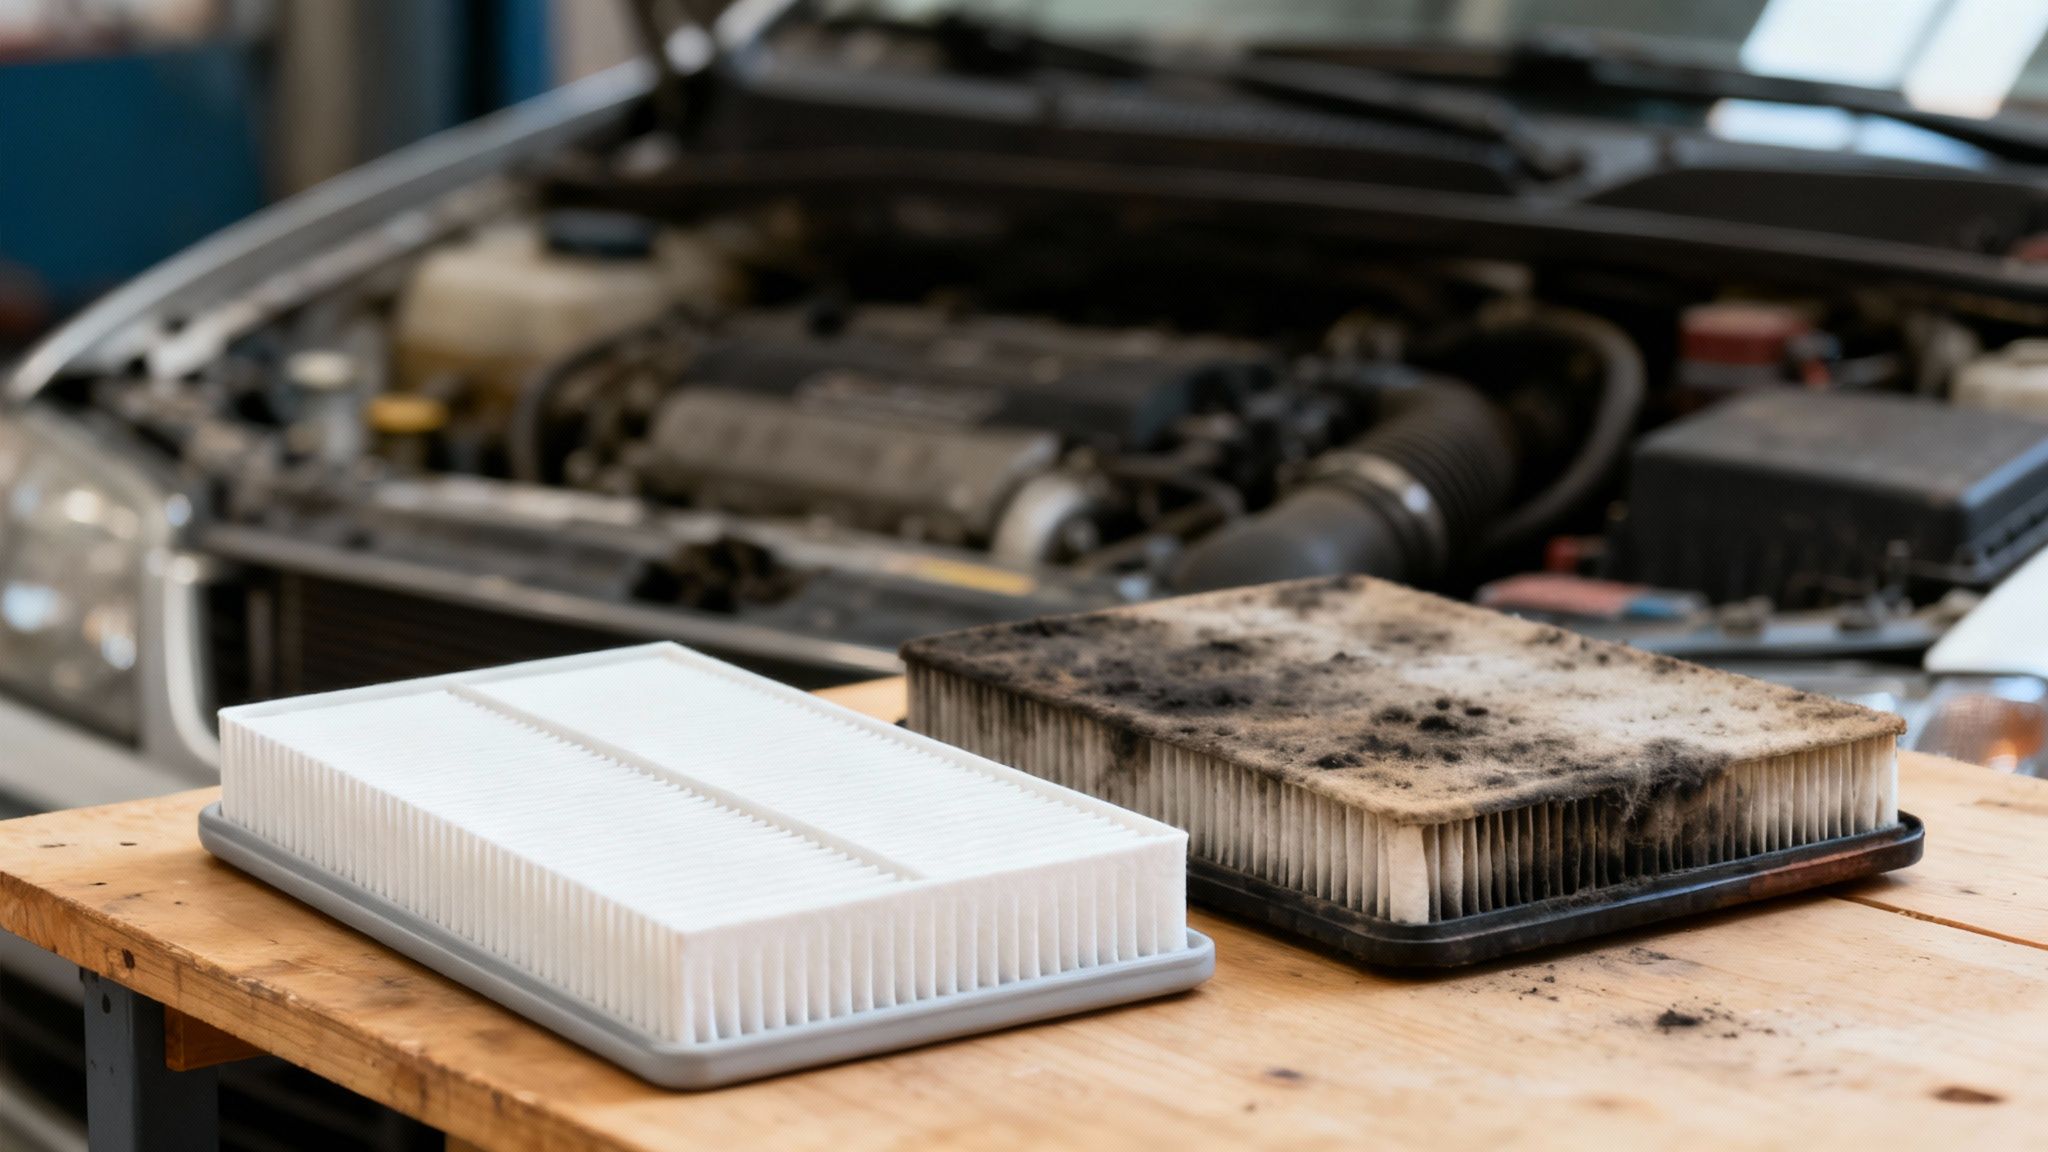
Give that old filter a good look. See all that dirt, dust, and grime? That’s proof this simple bit of maintenance was long overdue.
Pro Tip: Before dropping the new filter in, take a shop rag or a small vacuum and clean out the bottom of the airbox. You’ll probably find leaves, dead bugs, and other road gunk in there. Cleaning it out ensures your new filter starts with a clean slate.
Installing the New Filter and Closing Up
Time for the new filter. Set it into the housing the exact same way the old one came out. You want to make sure the rubber seal around the edge sits flush against the housing. A poor seal lets dirty air sneak past the filter, which completely defeats the purpose.
With the new filter sitting snugly, place the cover back on. Make sure it's lined up perfectly before you re-fasten the clips or screws.
If you’re tightening screws, work in a crisscross pattern (like you would with lug nuts) to get an even seal. Just get them hand-tight; cranking down on them can crack the plastic. Give the whole housing a gentle shake to confirm it's secure, and you're all done. It’s that simple.
Watch Out for These Common Air Filter Mistakes
So you've decided to tackle your car's air filter replacement yourself. It’s one of the easiest DIY jobs out there, but a few simple slip-ups can turn this quick task into a real headache. I’ve seen these little mistakes lead to poor engine performance and, even worse, that dreaded check engine light.
The most frequent goof-up? Installing the new filter upside down. It sounds trivial, but that filter is designed for air to flow in one specific direction. Get it wrong, and you're choking your engine and letting gunk slip past.
Another all-too-common error is grabbing the wrong size filter. If it’s even a little too small, it won’t create a proper seal, allowing dirty air to sneak around the edges and head straight for sensitive components like your mass airflow sensor. That's a costly part to replace.
Getting a Perfect Seal is Non-Negotiable
Honestly, the most overlooked step is simply not closing the airbox housing correctly after the swap. If those clips aren't snapped shut or the screws aren't tight, you’ve just created an air leak. That leak messes with the air-fuel mixture and is a classic way to trigger a check engine light.
Don't just gloss over this part. It’s a huge deal. Dirty or improperly installed filters contribute to 1 in 10 premature engine failures, which can cost an average of $1,500+ to fix. You can dig into the automotive air filter market research for more on that.
To make sure you get it right every time, just follow these quick checks:
- Wipe it out. Before you drop the new filter in, clean any leaves, dirt, or debris out of the housing.
- Check the gasket. Make sure the rubber seal on the new filter sits perfectly flush inside the housing.
- Secure the lid properly. Fasten all the clips. If you have screws, tighten them in a crisscross pattern to ensure an even, tight seal.
Taking an extra 30 seconds to double-check your work is what separates a job well done from a future problem.
When to Skip the DIY and Visit a Professional
Look, we love empowering drivers to handle basic maintenance, but sometimes, calling in a professional is the smartest move you can make. A DIY job is great for straightforward tasks, but certain situations can turn a simple filter swap into a much bigger headache.
For instance, not all air filters are sitting right on top, easy to grab. On some newer or more compact cars, the air filter housing can be buried deep in the engine bay, tucked behind other components. If getting to the filter looks like you're about to perform surgery, it's best to stop before you start.
Know When to Call It Quits
One of the biggest signs to put the tools down is when you hit an unexpected snag. A screw that strips the second you try to turn it or an old, brittle plastic clip that snaps in your hand can turn a 15-minute job into an afternoon of frustration. Trying to force a stripped screw or a broken latch can permanently damage the airbox housing—a much more expensive fix.
What if you get the new filter in, but that pesky check engine light stays on? That’s a clear signal the problem might be more complex than just a dirty filter.
A professional service isn't just about changing a part. It's about getting a trained eye on your engine. An ASE-certified tech can spot underlying issues you might miss, ensuring the real problem gets fixed right the first time.
Here are a few times when calling a pro is your best bet:
- Tough to Reach: The filter housing is buried under other engine parts.
- Broken or Stripped Parts: You run into stripped screws, seized bolts, or snapped plastic clips.
- Stubborn Check Engine Light: The warning light doesn't turn off after you've replaced the filter.
- You Spot Other Problems: You notice fluid leaks, frayed wires, or cracked hoses near the airbox.
If you run into any of these roadblocks, don't risk making things worse. Getting an expert opinion ensures the job is done right. And for moments like that, knowing how to find a good mechanic is just as important as knowing how to turn a wrench.
Common Questions About Changing Your Air Filter
Even after a successful swap, it's normal to have a few lingering questions. We get asked these all the time by drivers who just want to make sure they've got everything right. Here are the straight answers to the most common ones.
How Often Should I Replace My Air Filter in Texas?
Your owner's manual probably gives you a ballpark figure like 15,000 to 30,000 miles, but that’s based on driving in "ideal" conditions. Let's be honest—the dusty roads and constant construction around Northeast Tarrant County are anything but ideal. All that extra grit clogs up your filter way faster.
For local drivers, a much better rule of thumb is to just pop the hood and look at the filter every time you get an oil change. If it’s dark, grimy, or full of leaves and bugs, it’s time to replace it. In our area, that could be as often as every 12,000 miles.
What's the Difference Between an Engine and Cabin Air Filter?
This is easily the most common point of confusion, but it's a simple one. They protect two totally different systems.
- Engine Air Filter: This is all about performance. It keeps dirt and debris out of your engine, ensuring it gets the clean air it needs for combustion. A clean one helps your fuel economy and horsepower.
- Cabin Air Filter: This one is for you. It filters the air that comes through your AC and heat vents, trapping pollen, dust, and other junk you don't want to be breathing.
Think of it this way: one protects your car's lungs, and the other protects yours. Both need to be checked regularly.
A completely clogged engine filter can mess with the air-fuel mixture enough to trigger a check engine light. Swapping in a new filter is a cheap first step, but if the light stays on, it's flagging a different problem that needs a real diagnosis.
A new filter can be a quick fix, but it's not a silver bullet for every warning light on your dash.
If you've done the job but still aren't sure, or you'd just rather have a pro handle it from the start, Express Lube & Car Care is here to help. Our ASE-certified technicians will get your filter swapped out in minutes. Stop by today for service you can trust! https://www.expressluberichlandhills.com