

Yes, a loose or damaged gas cap is one of the most common reasons a check engine light comes on, and it’s usually the cheapest problem your dashboard will ever throw at you. The fix starts at the pump: turn the cap until it clicks several times, then inspect the rubber seal for cracks. Replace a worn cap right away. If the light stays on after a few drive cycles or after installing a new cap, it’s time for a professional EVAP diagnostic rather than more guessing.
TL;DR:
- A loose or damaged gas cap often causes the check engine light to turn on, with codes like P0457 indicating a small leak in the EVAP system.
- Properly tightening the cap until it clicks or replacing a worn cap usually resolves the issue within one to three drive cycles.
- If the light persists after a new cap and drive cycles, the leak may be elsewhere, such as cracked hoses or a faulty purge valve, requiring professional diagnostics.
- Inspecting the rubber seal, threads, and ratchet mechanism on the cap is essential before replacement, and vehicle-specific caps are recommended for a proper seal.
- Routine checks and timely replacement of a worn cap can prevent recurring EVAP faults and reduce environmental impact from vapor emissions.
Table of Contents
- Loose Gas Cap Checklist: What to Do at the Pump
- Why a Loose Gas Cap Turns On the Check Engine Light
- How to Inspect and Replace a Faulty Gas Cap
- How Long Until the Check Engine Light Clears
- When a New Cap Doesn’t Fix It: Time for Professional Diagnostics
- Preventing Gas Cap Problems Before They Start
- How Express Lube & Car Care handles EVAP and gas cap issues
- Get your check engine light checked at Express Lube & Car Care
- Sources
- FAQ
Loose Gas Cap Checklist: What to Do at the Pump
Before you assume something expensive is wrong, run through this quick sequence. It takes less than five minutes and solves the problem more often than not.
- Shut off the engine and remove the cap. Look at the rubber O-ring seal for cracks, flattening, or stiffness. Wipe away any dirt, sand, or debris sitting on the filler neck threads.
- Reinstall the cap and tighten it until you hear the clicks. Most caps are designed to click several times when properly seated, and that ratcheting sound is your confirmation the seal is engaged, according to All About Engines.
- Drive normally for the next day or two. Your vehicle’s computer needs one to three complete drive cycles to reevaluate the EVAP system and decide whether the light should go off on its own.
- If the light is still on, get it scanned. A quick OBD-II read will tell you whether the code is cap-related or points to something deeper in the fuel vapor system.
Pro Tip: Don’t crank the cap as hard as you can. Overtightening strips the threads on the filler neck or cracks the cap’s plastic housing, which creates a new leak instead of fixing one.
Why a Loose Gas Cap Turns On the Check Engine Light
Your fuel tank isn’t just a container. It’s part of a sealed loop called the evaporative emissions system, or EVAP, that captures gasoline vapor instead of letting it escape into the air. That vapor gets routed to a charcoal canister, stored, and eventually burned in the engine instead of vented into the atmosphere. The whole system depends on being airtight, and the gas cap is one of its main seals.
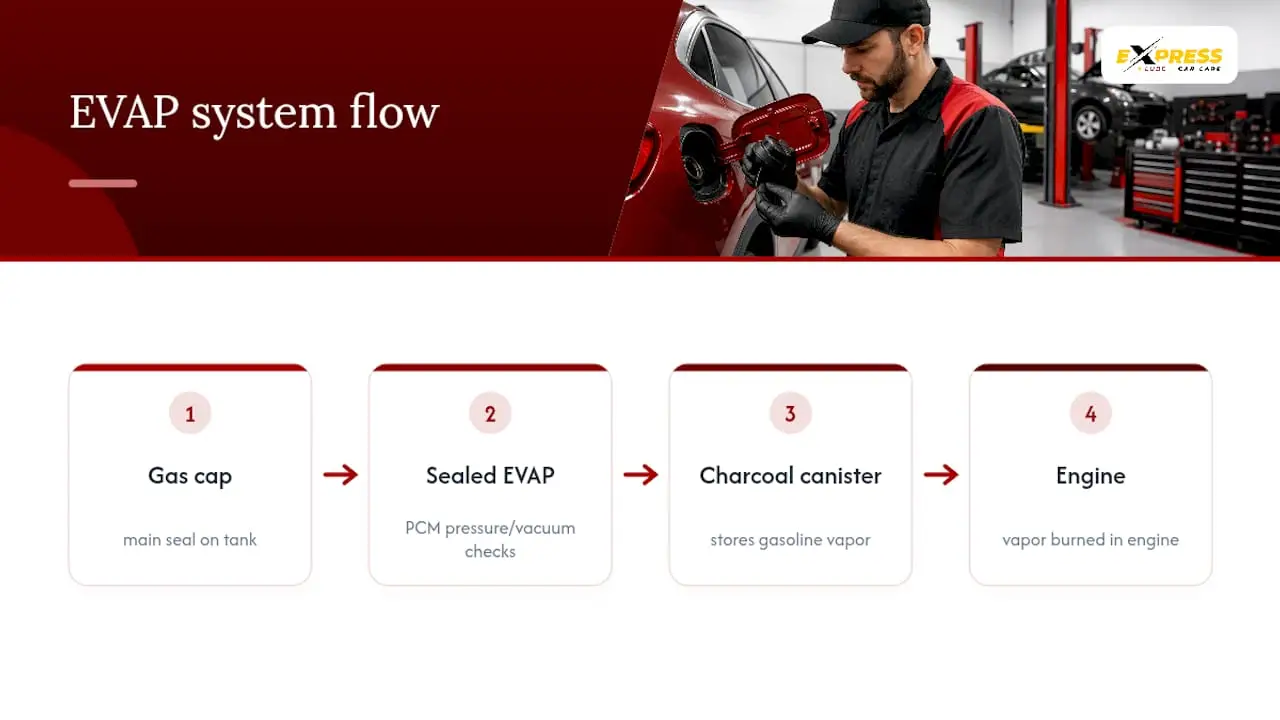
Your car’s computer, the powertrain control module, periodically pressurizes or draws a vacuum on the EVAP system and watches how that pressure holds. If it drops faster than expected, the computer logs a fault and lights up the dashboard. Even a half turn off center or a rubber gasket gone brittle with age can leak enough vapor for the monitor to notice, according to The Detroit Bureau.
That sensitivity is actually useful. Modern EVAP monitors are tuned to catch small leaks quickly, which is exactly why a dedicated code exists for a loose or missing cap rather than lumping it in with other fuel system faults. When a scan tool pulls P0457, that’s the system telling you almost directly: check your gas cap first. Other related codes point to different leak sizes. P0442 flags a small leak somewhere in the system, while P0455 and P0456 indicate a larger leak, according to Carparts. A gas cap issue often shows up as P0457, but a cracked hose or bad valve elsewhere in the system can trigger the others.
This is also why the check engine light can feel random. You didn’t hit a pothole, nothing sounds different, and the car drives exactly the same. The EVAP system operates in the background, and a fuel tank cap loose by even a few clicks is enough to set off a code without any drivability symptoms at all.
How to Inspect and Replace a Faulty Gas Cap
A gas cap looks simple, but there’s more going on than a screw-on lid. Three things tend to fail: the rubber seal, the threads, and the internal ratcheting mechanism that lets you know it’s tight.
Start with the rubber O-ring that runs around the base of the cap. Over years of heat, cold, and gasoline exposure, that rubber hardens and cracks, and a cracked seal can’t hold pressure no matter how tight you turn the cap. Next, check the threads on both the cap and the filler neck itself for stripping or cross-threading. Finally, listen for the clicks when you tighten it. If the cap spins freely without ever clicking, the ratchet mechanism inside has failed and the cap needs replacing.
Here’s a simple inspection and replacement routine:
- Remove the cap and wipe the filler neck opening clean of dirt, gasoline residue, and dust.
- Examine the O-ring closely under good light, feeling for stiffness or visible cracking.
- Check the filler neck itself for corrosion, especially on older vehicles that have spent winters on salted roads, since a corroded or bent neck can prevent even a brand-new cap from sealing properly, according to AA1Car.
- If anything looks worn, buy a vehicle-specific or OEM replacement cap rather than the cheapest universal option on the shelf. A generic cap that doesn’t match your fuel system’s exact thread pitch or seal design can leave you right back where you started.
- Reinstall and tighten until the clicks confirm a full seal.
Pro Tip: Keep your receipt when you buy a replacement cap. If it fails to stop the light within a couple of drive cycles, you’ll want to rule it out quickly and move on to checking the filler neck or scheduling a proper EVAP diagnostic.
How Long Until the Check Engine Light Clears
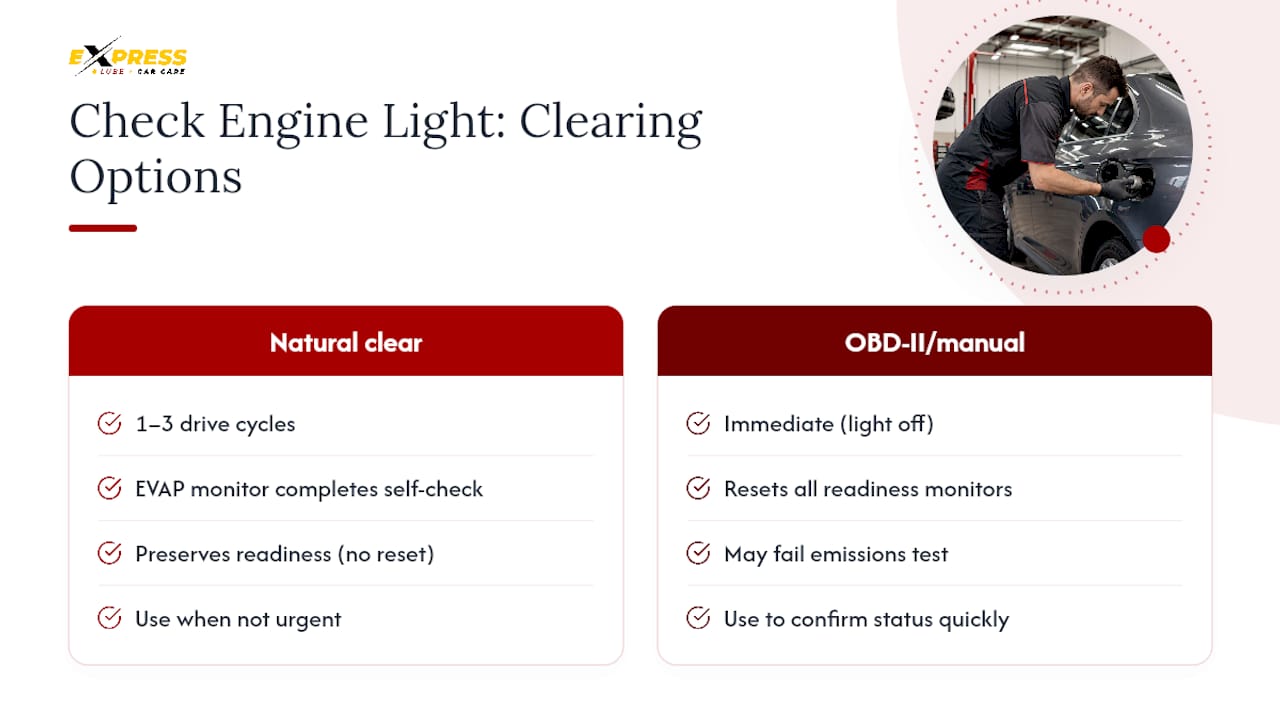
Patience matters here more than people expect. After tightening or replacing the cap, your vehicle typically needs one to three complete drive cycles, which usually involve varied driving conditions over a moderate distance, before the EVAP monitor finishes its self-check and clears the code automatically, according to Steer. A drive cycle isn’t just any trip. It usually involves a cold start, a warm up period, and a mix of city and highway speeds that let the monitor run its full pressure test.
You can speed up confirmation with an OBD-II scanner, which shows both the stored code and the EVAP monitor’s readiness status. Clearing the code manually with a scanner will turn the light off immediately, but it also resets all your readiness monitors, not just the EVAP one. If you’re due for an emissions test soon, that reset can actually work against you, since some testing programs require the monitors to complete a full cycle before they’ll pass your vehicle, according to a guide from EngineerSkill. Letting the system clear the code naturally through normal driving avoids that headache entirely.
If the light persists after several days of driving with a new cap, the leak is likely elsewhere in the EVAP system. Something else in the EVAP system is letting vapor escape.
When a New Cap Doesn’t Fix It: Time for Professional Diagnostics
Replacing the cap is the right first move because it’s cheap and it solves the problem most of the time. But when the check engine light returns even after a fresh cap and a full drive cycle, throwing more parts at the car stops making sense. That’s when a shop visit saves you money instead of costing you more.
A handful of components downstream of the cap commonly cause the same EVAP codes:
- Cracked or brittle EVAP hoses that have dried out with age
- A stuck-open or stuck-closed purge valve or vent valve
- A saturated or physically cracked charcoal canister
- A corroded or bent filler neck that won’t seal against any cap
Guessing which one is at fault and swapping parts one at a time is expensive and frustratingly slow. Professional shops skip that guesswork with two main tools. An OBD-II scan confirms exactly which code is stored and whether the EVAP monitor has run and passed since the last repair. A smoke test goes further: technicians pump a harmless smoke or vapor into the pressurized EVAP system and watch for exactly where it escapes, which pinpoints the failure fast instead of relying on trial and error, according to AA1Car. Replacing the cap first is genuinely the smart move, and if the code comes back, a smoke test lets a shop find the real leak without replacing multiple parts on a hunch.
This is where working with ASE-certified technicians and a shop that documents findings with digital inspection photos makes a real difference. You see exactly what they found, whether it’s a cracked hose or a corroded filler neck, instead of taking a verbal explanation on faith. If you want a deeper walkthrough of the diagnostic process, our check engine light guide covers what happens once your car is on the scanner.
Preventing Gas Cap Problems Before They Start
A little routine attention keeps this whole issue from repeating itself every few months.
Replace your cap the moment you notice the O-ring feels dry, hardened, or shows visible cracks, rather than waiting for the check engine light to make the decision for you. A worn cap can often be replaced inexpensively, but ignoring it could cause repeated fault codes, according to AutoZone. Ask to have it checked during routine service visits since it’s a thirty-second inspection that most people never think about.
When you do need a new one, spend the extra few dollars on a cap made for your specific vehicle instead of the bargain universal version. Thread pitch and seal design vary between manufacturers, so vehicle-specific caps are recommended, and a poor match won’t seal correctly no matter how many times it clicks.
On older vehicles, especially anything that’s seen a lot of winter road salt, take a look at the filler neck itself for rust or pitting. A tethered cap, standard on many newer vehicles, also helps you avoid the classic scenario of driving off with the cap left on the pump island entirely.
How Express Lube & Car Care handles EVAP and gas cap issues
When a customer in Richland Hills comes in with a check engine light and a suspected gas cap problem, we don’t start by replacing parts. We start with an OBD-II scan to confirm the actual stored code, followed by a visual inspection of the cap, seal, and filler neck. If the code persists after a proper cap replacement, we move to a smoke test to trace the leak to its real source instead of guessing.
Every inspection is documented with digital photos so you can see exactly what our ASE-certified technicians found, and eligible repairs are backed by our 24-month/24,000-mile warranty. Many gas cap and basic EVAP diagnostics can be handled same-day, especially for walk-ins.
Get your check engine light checked at Express Lube & Car Care
Tightening or swapping your own gas cap solves this problem often enough that it’s always worth trying first. But when the light won’t quit or you’d rather have someone confirm the real cause before you spend another dollar, Express Lube & Car Care runs OBD-II code reading and EVAP smoke testing with ASE-certified technicians, and every finding comes with digital inspection photos so you know exactly what’s happening under your fuel door.
There’s no need to sit and wonder whether that dashboard light means something serious. Our team can pull the code, check your cap and filler neck, and walk you through the results the same day in most cases. Current customers can also check our oil change and service specials page for ways to bundle a diagnostic visit with other maintenance you’re due for. Ready to get it looked at? Book an appointment through our scheduling page or call us directly at (817) 284-8478.
Sources
For more on interpreting dashboard warnings, see our guide to what your check engine light means and our check engine diagnostics page. If fuel odor is part of what sent you searching, this odor-diagnosis resource walks through tracking a smell to its source.
- Check Engine Light: Is a Loose Gas Cap the Cause? – The Detroit Bureau
- Carparts
- Loose Gas Cap Symptoms & Check Engine Light Codes – Steer
- Gas cap loose — AA1Car library (EVAP diagnostics)
- Check engine light on? Your gas cap might be loose — Here’s why – All About Engines
FAQ
What happens if a gas cap is loose?
A loose gas cap breaks the seal on your fuel system’s EVAP loop, letting vapor escape and often triggering fault codes like P0457, which usually turns on the check engine light within a day or two of driving.
How long until the check engine light resets after a loose gas cap?
Once the cap is tightened or replaced, expect one to three drive cycles before the light clears on its own as the EVAP monitor completes its checks.
How do I know if my gas cap is causing my check engine light?
An OBD-II scan showing code P0457 points directly at the gas cap, though codes like P0442 or P0455 suggest the leak may be elsewhere in the EVAP system.
What should I do if I lose my gas cap?
Buy a replacement as soon as possible rather than driving without one, since an open filler neck lets vapor escape freely and will almost certainly trigger the check engine light along with a small amount of fuel evaporation.
Can a loose gas cap actually waste gas or harm the environment?
Yes, a poorly sealed cap lets raw fuel vapor evaporate into the air instead of being captured and burned by the engine, which is a small but real environmental impact and part of why the EVAP system is monitored so closely.